Showing posts with label DIY. Show all posts

Sunday, November 23, 2014

GRINCH CHRISTMAS STOCKINGS


GRINCH CHRISTMAS STOCKINGS
I think I started this project 2 years ago.  I've wanted Dr. Suess Grinch Christmas stockings but I could never find the ones I wanted.  I started collecting bright fabric snippets here and there and I finally decided it was just time to do it!

My tree is Grinch-themed and a Grinch is our tree topper so it seemed necessary for our stockings to match!  

(very loose inspiration)
Now if we could only get around to building a mantle...

Ahhhh...well.  

Supplies:

GRINCH CHRISTMAS STOCKINGS
5/8 yard of minky, random cuts of Christmas fabric, pom-poms, rick-rack, Grinch ribbon, and quilt batting.
I had some leftover quilt batting that worked out perfect.  You could also use thick interfacing or really any sturdy fabric.  I wanted the stockings to have a bit of a quilted look to them.

GRINCH CHRISTMAS STOCKINGS

I cut them first into squares.  For some reason, this works for me as a beginning to carve from.

GRINCH CHRISTMAS STOCKINGS

I then cut them into stockings of random shapes and widths-no two the same.

GRINCH CHRISTMAS STOCKINGS

I laid out my minky and cut backing for each, being careful to keep them facing upright.  I cut minky now so that I have scraps to use for the front.

GRINCH CHRISTMAS STOCKINGS

I then laid out my scraps on top of the stockings, as randomly as possible.  You want some overlap for the seams.

GRINCH CHRISTMAS STOCKINGS

I hadn't realized how many of my patterns were polka-dot until I laid it all out!!  I guess I'm really into polka dots...

GRINCH CHRISTMAS STOCKINGS

I then carefully laid out the scraps in their same order on the floor next to the stocking and selected the center piece.  It doesn't have to be perfectly center-just closeish.  I then laid the center peice in the center of the batting stocking.

GRINCH CHRISTMAS STOCKINGS

If you want to, you can actually spray glue that piece to the middle so there's no chance of it moving.  I didn't bother since it wasn't uber important AND these really are so flexible.  I then pinned the next pieces up and down to the red piece, pretty sides together.

GRINCH CHRISTMAS STOCKINGS

Pinned and pinned.

GRINCH CHRISTMAS STOCKINGS

I went and stitched those seams, directly to the batting.

GRINCH CHRISTMAS STOCKINGS

I then pinned on the next up and down pieces and sewed those seams.  If you've ever made a strip quilt, that is the inspiration for this.

GRINCH CHRISTMAS STOCKINGS

I continued to work my way out until all of the strips are sewed together and to the batting.

GRINCH CHRISTMAS STOCKINGS

I then pinned and sewed my embellishments.  I'm so in love with these pom-poms!!

GRINCH CHRISTMAS STOCKINGS

And then laid out it's minky backing twin, pinning and sewing them pretty sides together.  I flipped them right side out after trimming the inner seams and this is what the inside looks like:

GRINCH CHRISTMAS STOCKINGS

I like that instead of having all those seams on the inside they are all on the other side of the batting-giving the inside a smooth feel and protecting your seams year to year as cute little hands dig candy out of these.

I folded in the top and finished it off.  Binding the top would totally be an option as well.  I also played with the idea of lining the entire thing and then using the lining as a top binding BUT it just seemed excessive with all these seams tucked in so nicely.

I then folded my Grinch ribbon in half and added the hanger!

GRINCH CHRISTMAS STOCKINGS

Voila!  And it only took me 2 years!

GRINCH CHRISTMAS STOCKINGS

Grinch Stockings!!  What are your fun Holiday crafts this year??  Share with me below! (especially if they're Suess-themed!)

GRINCH CHRISTMAS STOCKINGS

Thursday, October 2, 2014

DIY CHILDREN'S FURRY VEST

Last year about this time I decided that my girls needed one of these cute furry vests that everyone has been selling.  I immediately decided also that I wouldn't be spending the $20+ that they cost and I spent $5 buying furry fabric instead.  It quickly ended up in the sewing cupboard and here we are a year later finally doing something with it!

Yay me.

Anyway, this vest is super easy to make, takes a good half an hour or less AND will be the talk of the kindergarten (nothing is cooler than dressing like a furry kitty cat).  I have single-handedly propelled Paisley into the higher social circles of the cool kids that wear furry clothes.

And seriously, we live in the desert.  We rarely need warm clothes so this little hint of extra warmth is perfect.

Supplies:  Furry Fabric, maybe a 1/4 yard, scrap fabric or a cotton for lining, ribbon/lace for the tie and a t-shirt that fits a little big.


Mmmmm...furry fabric.


I like to do things like this on the fold so that everything is equal on both sides.  Fold your cotton in half and cut out (using the existing t-shirt to measure) the back panel.  Be sure to leave at least a 1/2" extra all around.  We can always go smaller but never bigger!!


I used the back panel to cut out the front 2 and then cut down the middle.  I then V-ed the top so it was more vesty shaped.


Layout your cotton pieces on your fur and cut the same.


Pin the top shoulder seams and the side seams, pretty sides together for both the furry vest and the cotton.


Sew them together.  This is also a good time to put this on your kid and see if it fits.  If it's too big you can take in seams here-just be sure to do the same to both.


Cut your lace/ribbons into 2 equal parts.


Pin them to where you want them to be on the pretty side of your vest.


Then pin your cotton vest to your furry vest, pretty sides together.  Pin the entire collar/front portion and all the way around the bottom.


Sew them together.  Once again, before you turn it you can have your child try this onto see if it fits.  I was sure to run over where the ties are a few times too to help prevent them from being pulled out.


Clip your corners.


I like nice pointy corners when I turn something out.


Pull your fur over the cotton.  Because of the ragged nature of the fur it's really easy to hide a zigzag stitch so I didn't bother to turn the raw edge over (I could so quickly deem myself "THE lazy seamstress")  Zigzag your armholes.


Done!!  Furry vest complete!


She very much approved.


And had a blast wearing it to school the next day!  I'm so in love with hello apparel lately and I found these cute leggings at WALMART!!  $5!!


Go make a super easy vest.  Your cool kid will thank you.

Tuesday, August 5, 2014

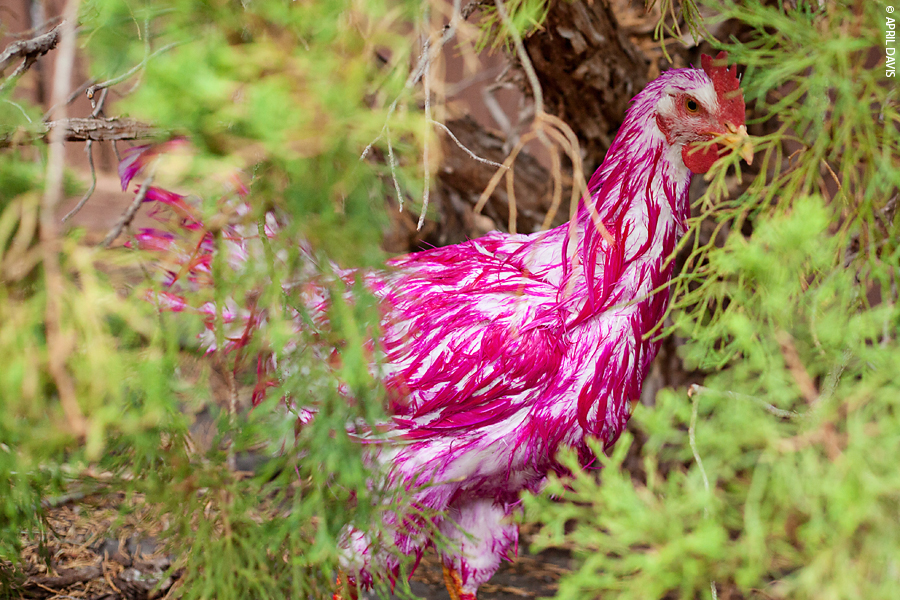
THE PINK CHICKEN: A DIY PROJECT

That's right, we dyed a chicken.  It just made sense?  Our good friends have a habit of dying their darling poodles mohawk pink and decided to pink it up while visiting recently.  Things escalated quickly.  Next thing we knew parts of my head hair were being bleached along with everyone else's.  Also, we dyed the one white chicken we own.

Poor Steven.

Initially the other chickens shunned her.  Then they feared her.  Now they respect her.

We have a pink chicken.


We used the supreme-high-quality-first-pink-dye-we-could-find-at-wal-mart stuff.  It worked amazing.  To date I think this is the most vibrant pink dye I have ever seen.  And I've used some pink hair dye in my day.


She had no idea what was coming.


Also didn't seem to mind TOO much what was going on.  It wasn't until we let her go that she became really upset.  The other chickens were super rude and immediately started picking on her.  Jealous birdies.


Not that she really camouflaged before but....


We rinsed her in a kiddie pool and she stared shivering!!  It was the saddest and cutest thing.


She's so tiny when she's wet!


I snuggled her up and took her inside to shower.  There was SO.MUCH.DYE.  It took a long time for the water to run clear but I wasn't about to have her ingesting dye.  I love my birdie.


Surprisingly enough chickens love being blow dried!!  She sat their happily closing her eyes and enjoying thw warm air.


Almost dry and looking vibrant.


Strutting.  Such a bird.


See how tall that jaunt is!!  She is a proud pink chicken!  After a day or two of adjustment her and the flock are friends again.  We were worried but they seem to be getting along.  Now I'm just wondering how long this will last?  I guess we'll see how molting goes...

Related Posts Plugin for WordPress, Blogger...